
Easy MySQL Installation Guide: 4 Step-by-Step Server Setup Methods
Master local database setup with this complete MySQL installation guide. Learn XAMPP, MySQL Community Server, Workbench, and phpMyAdmin on Windows, macOS, and Linux.
Overview: Understanding MySQL Installation & Local Server Architecture
Quick MySQL Installation Summary:
- Local Development Sandbox: A local MySQL installation allows developers to create, test, and query databases on their personal computers without paying for external cloud hosting.
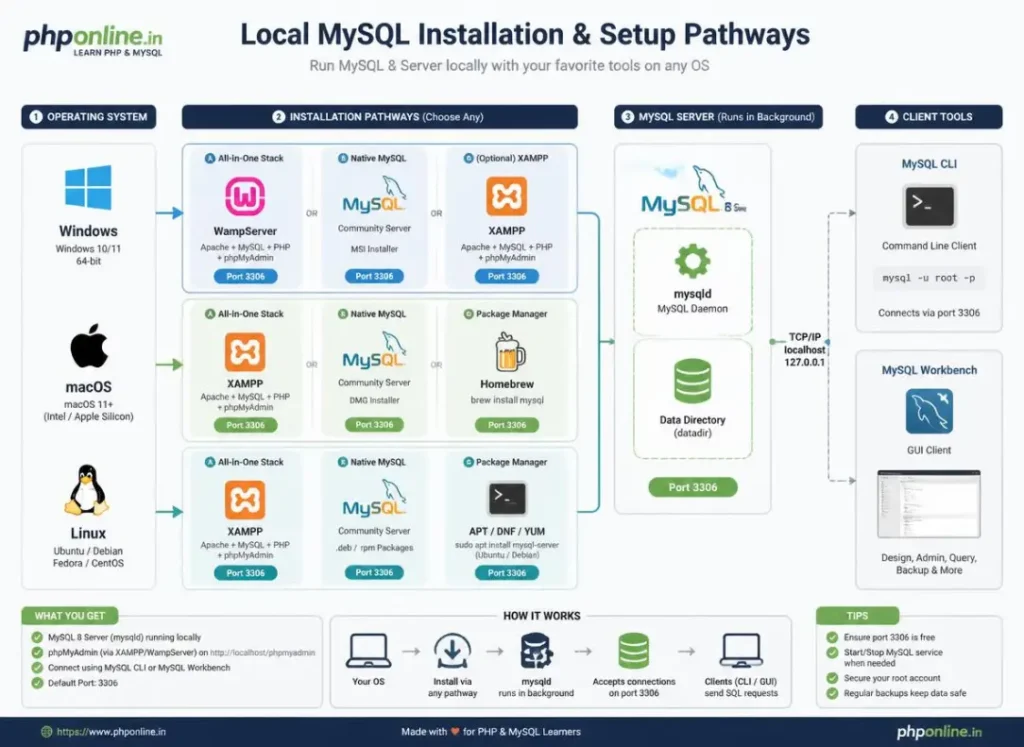
- Two Primary Setup Routes: You can set up MySQL using an all-in-one development stack (like XAMPP or WampServer with phpMyAdmin) or install the standalone native MySQL Community Server with MySQL Workbench.
- The Background Service (mysqld): MySQL runs silently as a background service daemon (
mysqld) listening for incoming SQL connections on default port3306. - Command-Line Interface (CLI): The built-in
mysqlterminal client provides direct command-line access to execute queries, manage users, and inspect table schemas. - Web-Based GUI (phpMyAdmin): Bundled with stacks like XAMPP, phpMyAdmin provides an intuitive browser interface for visually creating databases, importing SQL files, and running queries.
Welcome to Lesson 2 of our structured Database curriculum. Following our previous lesson on Easy MySQL Introduction Guide: 5 Core Relational Database Concepts & Examples, you now understand the theory behind relational database management systems (RDBMS), tables, rows, columns, and foreign keys. The next essential hands-on milestone is completing your local MySQL installation.
Before you can write SQL queries or connect a backend PHP application to a database, you must install and configure the MySQL server engine on your operating system. Whether you develop on Windows, macOS, or Linux, having a properly configured local database environment gives you the freedom to build and test applications rapidly in an isolated, secure offline environment.
In this comprehensive MySQL installation guide, we will explore all-in-one stacks (XAMPP), standalone MySQL Community Server installation, MySQL Workbench configuration, CLI terminal commands, port 3306 troubleshooting, and verification tests.
Prerequisites Before Installing MySQL
Before beginning the MySQL installation steps, verify that your computer meets these basic requirements:
- Operating System: Windows 10/11, macOS (Intel or Apple Silicon), or a modern Linux distribution (Ubuntu, Debian, Fedora).
- Hardware: Minimum 4 GB of RAM and at least 2 GB of free disk storage space.
- Administrative Access: Administrator rights (Windows) or root
sudopermissions (macOS/Linux) to install system services.
If you need to review the core architecture of relational databases before spinning up a server, check our foundational guide on Easy MySQL Introduction Guide: 5 Core Relational Database Concepts & Examples.
1. Choosing the Right MySQL Installation Method
Depending on your workflow and operating system, you can choose between two main setup paths:
| Installation Method | Included Components | Target Audience | Primary Benefit |
|---|---|---|---|
| All-in-One Stacks (XAMPP / WampServer) | Apache, PHP, MySQL (MariaDB), phpMyAdmin Web GUI | Beginners, PHP Developers, Full-Stack Learners | Zero-Configuration: Installs a complete web and database server in a single click. |
| Standalone MySQL Community Server | MySQL Server daemon (mysqld), MySQL CLI Client | Intermediate/Advanced Developers, System Admins | Installs pure official MySQL without bundled web server overhead. |
| MySQL Workbench Bundle | MySQL Server + Official Desktop Visual GUI tool | Database Architects, SQL Developers | Visual schema modeling, query execution, and performance dashboards. |
2. Method 1: Installing MySQL via XAMPP (Fastest & Easiest)
For web developers using PHP and JavaScript, installing MySQL via **XAMPP** is the most popular, hassle-free approach.
Step-by-Step XAMPP Setup:
- Download the latest XAMPP installer from the official Apache Friends website (
apachefriends.org). - Run the installer and ensure both **Apache** and **MySQL** components are selected.
- Complete the installation wizard (Default directory:
C:\xamppon Windows or/Applications/XAMPPon macOS). - Launch the **XAMPP Control Panel**.
- Click the **Start** button next to **MySQL** (and Apache if using the browser GUI).
- When MySQL turns green with port
3306displayed, your server is officially running!
Accessing phpMyAdmin:
Once Apache and MySQL are running in XAMPP, open your web browser and navigate to:
http://localhost/phpmyadmin/This opens the web-based phpMyAdmin dashboard where you can visually create databases, tables, and execute SQL statements without touching the terminal.
Want to test standard code syntax or validate script outputs? Try our Online Code Editor and verify markup using our HTML Validator Tool.
3. Method 2: Installing Standalone MySQL on Windows (MSI Installer)
If you want pure MySQL without Apache or PHP bundled, use the official **MySQL Installer for Windows**:
Step-by-Step Standalone Windows Setup:
- Visit the official MySQL Developer Downloads page (
dev.mysql.com/downloads/installer/). - Download the **MySQL Community Server MSI Installer**.
- Run the installer and choose the **Developer Default** or **Server Only** setup type.
- Under **Type and Networking**, leave the Config Type as *Development Computer* and verify the Port is set to
3306. - Under **Accounts and Roles**, set a secure password for the default
rootadministrative user (Memorize this password!). - Under **Windows Service**, check *Standard System Account* and ensure *Start the MySQL Server at System Startup* is enabled.
- Click **Execute** to finalize the configuration steps.
4. Method 3: Installing MySQL on macOS & Linux
Installing on macOS (via Homebrew):
Open your macOS Terminal and execute:
# 1. Update Homebrew packages
brew update

# 2. Install MySQL Server
brew install mysql

# 3. Start MySQL as a persistent background service
brew services start mysql

# 4. Run the secure installation wizard to configure root password
mysql_secure_installation
Installing on Linux (Ubuntu / Debian):
Open your Linux terminal and execute:
# 1. Update package index
sudo apt update

# 2. Install MySQL Server package
sudo apt install mysql-server -y

# 3. Verify that the MySQL systemd service is active and running
sudo systemctl status mysql

# 4. Secure the installation (set root password and remove test databases)
sudo mysql_secure_installation
5. Verifying Installation via the MySQL Command-Line Client (CLI)
Once installed, verify that you can connect to the MySQL database engine using the command line:
Connecting to MySQL via Terminal / Command Prompt:
# Connect as root user (prompts for password)
mysql -u root -p
If using default XAMPP without a password configured yet, simply run:
# XAMPP default root connection (no password)
mysql -u root
Running Verification SQL Commands:
Once inside the MySQL shell (mysql>), test execution with these basic diagnostic commands:
-- 1. Check current MySQL server version
SELECT VERSION();

-- 2. View all existing databases on the server
SHOW DATABASES;

-- 3. Check current user and connection status
SELECT USER(), CURRENT_DATE();

-- 4. Exit the MySQL shell
EXIT;
Want to test code snippets live? Try running them in our Online Code Editor.
6. Adding MySQL to System Environment PATH (Windows)
If typing mysql in your Windows Command Prompt results in an error stating “‘mysql’ is not recognized as an internal or external command”, add the MySQL bin folder to your system PATH:
- Copy the path to your MySQL
bindirectory (e.g.,C:\Program Files\MySQL\MySQL Server 8.0\binorC:\xampp\mysql\bin). - Open Windows Search, type **Environment Variables**, and select **Edit the system environment variables**.
- Click the **Environment Variables…** button.
- Under **System variables**, select the **Path** variable and click **Edit…**.
- Click **New** and paste the copied MySQL
bindirectory path. - Click **OK** on all dialog boxes and restart your Command Prompt terminal.
7. Complete Hands-on Local Connection Test Example
Below is a complete HTML and JavaScript simulation demonstrating the connection handshake between a frontend web client, a backend connector, and a local MySQL Server instance running on port 3306:
<!DOCTYPE html>
<html lang="en">
<head>
    <meta charset="UTF-8">
    <meta name="viewport" content="width=device-width, initial-scale=1.0">
    <title>MySQL Local Server Handshake Simulation</title>

    <style>
        body {
            font-family: Arial, sans-serif;
            background-color: #f4f6f9;
            color: #333;
            padding: 30px;
            max-width: 650px;
            margin: 0 auto;
        }

        .server-card {
            background-color: #ffffff;
            border: 1px solid #e0e0e0;
            border-radius: 8px;
            padding: 25px;
            box-shadow: 0 4px 12px rgba(0,0,0,0.05);
        }

        .config-table {
            width: 100%;
            border-collapse: collapse;
            margin: 15px 0;
        }

        .config-table td {
            padding: 8px 12px;
            border: 1px solid #eee;
        }

        .config-table td:first-child {
            font-weight: bold;
            background-color: #f8f9fa;
            width: 40%;
        }

        .btn-connect {
            background-color: #0073aa;
            color: #ffffff;
            border: none;
            padding: 12px 20px;
            font-size: 14px;
            border-radius: 4px;
            cursor: pointer;
            width: 100%;
            font-weight: bold;
        }

        .log-terminal {
            margin-top: 15px;
            padding: 12px;
            background-color: #1e1e1e;
            color: #4caf50;
            font-family: monospace;
            border-radius: 4px;
            min-height: 80px;
            white-space: pre-wrap;
        }
    </style>
</head>
<body>

    <div class="server-card">
        <h2 style="color: #0073aa; margin-bottom: 10px;">Local MySQL Server Handshake</h2>
        <p>Verify local connection parameters before launching web applications:</p>

        <table class="config-table">
            <tr>
                <td>Hostname / Host</td>
                <td>127.0.0.1 (localhost)</td>
            </tr>
            <tr>
                <td>Default Port</td>
                <td>3306</td>
            </tr>
            <tr>
                <td>Default Superuser</td>
                <td>root</td>
            </tr>
            <tr>
                <td>Daemon Service</td>
                <td>mysqld (active)</td>
            </tr>
        </table>

        <button id="test-conn-btn" class="btn-connect">Test Local Connection Handshake</button>

        <div id="terminal-output" class="log-terminal">
Ready to test connection on port 3306...
        </div>
    </div>

    <script>
        const connectBtn = document.getElementById("test-conn-btn");
        const terminalOutput = document.getElementById("terminal-output");

        connectBtn.addEventListener("click", () => {
            terminalOutput.textContent = "Connecting to 127.0.0.1:3306 via TCP/IP socket...\n";

            setTimeout(() => {
                terminalOutput.textContent += "Authenticating user 'root'@'localhost'...\n";
            }, 600);

            setTimeout(() => {
                terminalOutput.textContent += "Handshake ACK received from mysqld.\n";
                terminalOutput.textContent += "SUCCESS: MySQL 8.0 Server online and responding on port 3306!";
            }, 1200);
        });
    </script>

</body>
</html>
Want to test this HTML layout code live? Try running it in our Online Code Editor.
Summary Comparison of MySQL Management Tools
| Tool Name | Interface Style | Included With | Primary Application Scenario |
|---|---|---|---|
| MySQL CLI | Terminal / Command Line | All MySQL installations | Direct server administration, automated scripting, production server maintenance. |
| phpMyAdmin | Web Browser GUI | XAMPP, WAMP, cPanel Web Hosting | Quick visual database creation, CSV/SQL import/export, beginner-friendly query execution. |
| MySQL Workbench | Desktop Software GUI | Official Oracle MySQL Installer | Visual EER database modeling, complex query analysis, server performance monitoring. |
| DBeaver / DataGrip | Universal Desktop GUI | Standalone Third-Party Downloads | Managing multiple database engines (MySQL, PostgreSQL, SQLite) from a unified client. |
Troubleshooting Common MySQL Installation Errors
| Observed Installation Issue | Probable Cause | Recommended Solution |
|---|---|---|
| Port 3306 already in use / MySQL service fails to start in XAMPP | Another instance of MySQL, MariaDB, or Skype is already occupying port 3306. | Stop the conflicting background service in Windows Task Manager, or change MySQL’s port to 3307 in my.ini. |
| ‘mysql’ is not recognized as an internal or external command | The directory containing mysql.exe has not been added to your system’s PATH environment variable. | Add your MySQL bin folder path (e.g., C:\xampp\mysql\bin) to the system PATH variable and restart terminal. |
| ERROR 1045 (28000): Access denied for user ‘root’@’localhost’ (using password: NO) | The server requires a password for root, but none was provided during the login command. | Connect using mysql -u root -p and enter the password configured during installation. |
| phpMyAdmin displays “Cannot connect: invalid settings” | MySQL service is stopped, or the password defined in config.inc.php does not match the server root password. | Start the MySQL service in XAMPP and verify password settings inside phpMyAdmin’s config.inc.php. Validate code with our HTML Validator Tool. |
Frequently Asked Questions (FAQ)
Q1: What is a MySQL installation and why is it needed for local web development?
A MySQL installation sets up the relational database server software (mysqld) on your local computer. It is needed so web applications can store, query, and manage data persistently on port 3306 during offline development without requiring live cloud hosting.
Q2: What is the difference between MySQL Community Server and XAMPP?
MySQL Community Server is the standalone, official database engine provided by Oracle. XAMPP is an all-in-one software package that bundles Apache web server, PHP, MariaDB/MySQL, and the phpMyAdmin web interface together in a single installer for easier setup.
Q3: What is the default port number used by MySQL?
The standard default port number used by the MySQL database server is 3306. Client applications (like PHP PDO scripts or MySQL Workbench) connect to 127.0.0.1:3306 by default.
Q4: How do you verify that MySQL is installed and running properly?
You can verify your installation by opening a terminal, running mysql -u root -p, and executing the SQL command SELECT VERSION();. If the server version number displays without errors, MySQL is functioning properly.
Next Steps & Official References
Consult official technical installation manuals on the MySQL Official Server Installation Guide (dev.mysql.com).
Before publishing your web page layouts, validate your code syntax using our PHPOnline HTML Validator Tool.
Ready for the next lesson in sequence? Proceed directly to the next lesson in Module 1: Next Lesson: MySQL Data Types (Numeric, String, Date & Time) →
# Summary
Here is what you've learned in this lesson:
- Overview: Understanding MySQL Installation & Local Server Architecture
- Prerequisites Before Installing MySQL
- 1. Choosing the Right MySQL Installation Method
- 2. Method 1: Installing MySQL via XAMPP (Fastest & Easiest)
- 3. Method 2: Installing Standalone MySQL on Windows (MSI Installer)
- 4. Method 3: Installing MySQL on macOS & Linux
- 5. Verifying Installation via the MySQL Command-Line Client (CLI)
- 6. Adding MySQL to System Environment PATH (Windows)
- 7. Complete Hands-on Local Connection Test Example
- Summary Comparison of MySQL Management Tools
- Troubleshooting Common MySQL Installation Errors
- Frequently Asked Questions (FAQ)
- Next Steps & Official References
Continue to the next lesson and learn more about MySQL Data Types.